3D Maya 09: Lighting, Shadows and Effect Tutorial

{youku}XMjc1NTAwNDI0{/youku}
Lights, shadows and effects are a specialised field in 3D and deserve an entire term to understand the concepts and applications of different lighting methods. This course can only afford one week on lighting. I hope to demonstrate the capabilities of Maya, and offer a platform for further exploration.
First make sure you are showing your resolution gate
View > Camera Setting > Resolution Gate

Press "7" will display your lights. If you have no lights (default) your scene will look black.
Create a directional light.
Create > Lights > Directional Lights

This option can be found in other menus
![]()

Select the light and rotate it to suit your scene. Then reduce this lights intensitiy. This light is used as a fill to make sure you have no areas of black in your scene.
Select your directional light in the outliner
Window > Outliner
Rotate and postition the light to suit your scene.

Double click in the outliner to open your Channels option. Lower the Intensity of your light appropriatly.

Next, create a spotlight Create > Lights > Spotlights

Select this light in the outliner. To position this light, go to Panels and look through selected
Panels > Look through selected

You will notice at the botton of your camera window it should say something like 'spotLight1'

Use this to positon your light in place. To go back to your original camera, go:
Panels > Perspective (or any other camera window you used)

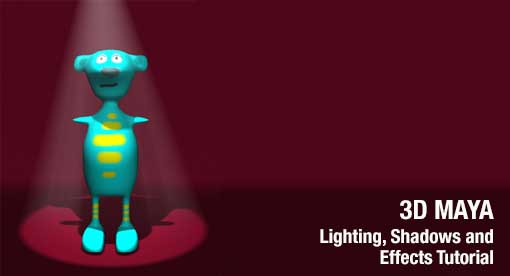
Looking at the scene below, you can see the the spotlight is above the character. Its edge is sharp, and there is no shadow, or light fog.

In your outliner window, double-click the spotlight to get the channels. Penumbra softens the spotlights edge, and drop-off effects the density and longevity of the light. Adjust these to suit your image.

Next is light effects. Click on the check box to apply.

Next is shadow. The quickest and simplest shadows are the depth map shadows. Click the 'Use depth map shadows' checkbox, and increase the filter size to match the penumbra of your spotlight.

Preview render will show a shadow, but the light fog doesnt go to the ground.

The manipulator tool needs to be selected. It can be found on the left hand side toolbar.

Select the manipulator, then select your spotlight.

It's only a small icon, so you need to look carefully for it. It should be near the spotligt icon in your scene. Think of it like a clock. The default setting is at one o'clock. Click the icon until it reaches seven o'clock.


Click and drag the bottom ring until it reaches the ground. Preview render, and it should look good!